2010年8月31日火曜日

groovyとApache Commons NetでNTPサーバから時刻を取得する

groovyとApache Commons NetでNTPサーバから時刻を取得するには、以下のコードを実行します。

import org.apache.commons.net.ntp.*

ntpclient = new NTPUDPClient()
ntpclient.open()
// NTPサーバより時刻取得
ti = ntpclient.getTime(InetAddress.getByName("ntp.nict.jp"))
ntpclient.close()
println "time:" + new Date(ti.getReturnTime())


動作環境
groovy 1.7.4, JDK6 Update21, Apache Commons Net 2.0

2010年8月30日月曜日

groovyとJNDIでOUを検索する

groovyとJNDIでOUを検索するには、以下のコードを実行します。

import javax.naming.*
import javax.naming.directory.*

// LDAPサーバに接続
env = new Hashtable()
env.put(Context.INITIAL_CONTEXT_FACTORY,
"com.sun.jndi.ldap.LdapCtxFactory")
env.put(Context.PROVIDER_URL, "ldap://localhost:10389/ou=system")

env.put(Context.SECURITY_AUTHENTICATION, "simple")
env.put(Context.SECURITY_PRINCIPAL, "uid=admin,ou=system")
env.put(Context.SECURITY_CREDENTIALS, "secret")

ctx = new InitialDirContext(env)
// OUを検索
sc = new SearchControls()
sc.setSearchScope(SearchControls.SUBTREE_SCOPE)
results = ctx.search("", "(objectclass=organizationalUnit)", sc)
while(results.hasMore()){
println "found:" + results.next().toString()
}


動作環境
groovy 1.7.4, JDK6 Update 21, Apache Directory Server 1.5.7

2010年8月26日木曜日

groovyとJRegistryでデフォルトブラウザの実行ファイルを表示する

groovyとJRegistryでデフォルトブラウザの実行ファイルを表示するには、以下のコードを実行します。

import com.registry.*

// コンピュータのデフォルトブラウザの実行ファイルを表示する
regkey = RegistryKey.parseKey("HKEY_CLASSES_ROOT\\"+
"http\\shell\\open\\command")
println regkey.getValue(RegistryKey.DEFAULT_VALUE_NAME).getValue()


動作環境
groovy 1.7.2, JDK6 Update20, JRegistry 1.6.5

関連項目
JRegistryのdownloadページ
http://sourceforge.net/projects/jregistry/

2010年8月25日水曜日

groovyとJRegistryでWindowsの使用者の組織を表示する

groovyとJRegistryでWindowsの使用者の組織を表示するには、以下のコードを実行します。

import com.registry.*

// コンピュータの使用者の組織を表示する
regkey = RegistryKey.parseKey("HKEY_LOCAL_MACHINE\\"+
"SOFTWARE\\Microsoft\\Windows NT\\CurrentVersion")
println regkey.getValue("RegisteredOrganization").getValue()


動作環境
groovy 1.7.2, JDK6 Update20, JRegistry 1.6.5

関連項目
JRegistryのdownloadページ
http://sourceforge.net/projects/jregistry/

2010年8月24日火曜日

groovyとJRegistryでWindowsの使用者情報を表示する

groovyとJRegistryでWindowsの使用者情報を表示するには、以下のコードを実行します。

import com.registry.*

// コンピュータの使用者名を表示する
regkey = RegistryKey.parseKey("HKEY_LOCAL_MACHINE\\"+
"SOFTWARE\\Microsoft\\Windows NT\\CurrentVersion")
println regkey.getValue("RegisteredOwner").getValue()


動作環境
groovy 1.7.2, JDK6 Update20, JRegistry 1.6.5

関連項目
JRegistryのdownloadページ
http://sourceforge.net/projects/jregistry/

2010年8月23日月曜日

groovyとOracleでインデックスの使用状況を調べる

groovyとOracleでインデックスの使用状況を調べるには、以下のコードを実行します。

import groovy.sql.Sql

sql = Sql.newInstance(
"jdbc:oracle:thin:@localhost:1521:orcl",
"scott",
"tiger",
"oracle.jdbc.driver.OracleDriver")

// モニタリングをオンにする
sql.eachRow("select index_name from user_indexes where index_type <> 'LOB'"){
sql.execute("alter index " + it.index_name + " monitoring usage")
}

// クエリ実行
query = """
select * from emp where empno = 7788
"""
sql.eachRow(query){
}

// モニタリングをオフにする
sql.eachRow("select index_name from user_indexes where index_type <> 'LOB'"){
sql.execute("alter index " + it.index_name + " nomonitoring usage")
}

// 使用状況
sql.eachRow("select index_name, table_name, used from v\$object_usage"){
println("${it.index_name},${it.table_name},${it.used}")
}


動作環境
groovy 1.7.4, JDK6 Update21, Oracle11g R2

2010年8月22日日曜日

groovyとOracleでCLOB列に文字列を追加する

groovyとOracleでCLOB列に文字列を追加するには、以下のコードを実行します。

import groovy.sql.Sql

sql = Sql.newInstance(
"jdbc:oracle:thin:@localhost:1521:orcl",
"scott",
"tiger",
"oracle.jdbc.driver.OracleDriver")

// テーブル作成
sql.execute("""create table clobtest
(
cid number(4) not null,
content clob,
constraint pk_clobtest primary key (cid)
)"""
)
// CLOBにテキスト挿入
sql.execute("""insert into clobtest values (1, 'abc')""")

// CLOBの表示
sql.eachRow("select * from clobtest"){
println("${it.cid}")
println("${it.content.getCharacterStream().text}")
}
// CLOBにテキストを追加
sql.execute("""
declare
c1 clob;
begin
select content into c1 from clobtest where cid = 1 for update;
dbms_lob.append(c1, 'def');
end;
""")
// CLOBの表示
sql.eachRow("select * from clobtest"){
println("${it.cid}")
println("${it.content.getCharacterStream().text}")
}


動作環境
groovy 1.7.4, JDK6 Update21, Oracle11g R2

2010年8月21日土曜日

groovyとSimpleODSでOpenOffice Calcのセルを折り返し設定する

groovyとSimpleODSでOpenOffice Calcのセルを折り返し設定するには、以下のコードを実行します。

import org.simpleods.*

// odsファイル作成
OdsFile of = new OdsFile("test10.ods")
// テーブル追加
tableName = ""
"シート1".each {
tableName += "&#" + Character.codePointAt(it, 0) + ";"
}
of.addTable(tableName)
tn = of.getTableNumber(tableName)

// 折り返し設定したスタイル
tsw = new TableStyle(TableStyle.STYLE_TABLECELL, "wraps")
tsw.setFontWrap()

// セル設定
of.setCell(tn, "A1", "ABC")
of.setCell(tn, "A2", "テスト用の長い文字列", tsw)
of.setCell(tn, "B1", 123)

of.save()


出力ファイルのイメージ
SimpleODSでセルの折り返しを設定したセル

動作環境
groovy 1.7.2, JDK6 Update20, SimpleODS 0.4.4

関連項目

2010年8月20日金曜日

groovyとSimpleODSでOpenOffice Calcの用紙サイズを設定する

groovyとSimpleODSでOpenOffice Calcの用紙サイズを設定するには、以下のコードを実行します。

import org.simpleods.*

// odsファイル作成
OdsFile of = new OdsFile("test9.ods")
// テーブル追加
tableName = ""
"シート1".each {
tableName += "&#" + Character.codePointAt(it, 0) + ";"
}
of.addTable(tableName)
tn = of.getTableNumber(tableName)
// セル設定
of.setCell(tn, "A1", "ABC")
of.setCell(tn, "A2", "日本語")
of.setCell(tn, "B1", 123)

// ページ設定
ps = of.getDefaultPageStyle()
// 用紙サイズをA4横に設定
ps.setPaperFormat(PageStyle.STYLE_PAPERFORMAT_A4)
ps.setPrintOrientationHorizontal()

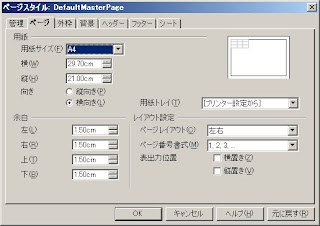
of.save()


出力ファイルのページスタイルのイメージ
SimpleODSで用紙サイズを設定したシート

動作環境
groovy 1.7.2, JDK6 Update20, SimpleODS 0.4.4

関連項目

2010年8月19日木曜日

groovyとSimpleODSでOpenOffice Calcのセルに罫線を設定する

groovyとSimpleODSでOpenOffice Calcのセルに罫線を設定するには、以下のコードを実行します。

import org.simpleods.*

// odsファイル作成
OdsFile of = new OdsFile("test8.ods")
// テーブル追加
tableName = ""
"シート1".each {
tableName += "&#" + Character.codePointAt(it, 0) + ";"
}
of.addTable(tableName)
tn = of.getTableNumber(tableName)

// 文字色を設定したスタイル
bs = new BorderStyle("0.1cm", Util.COLOR_Aqua,
BorderStyle.BORDER_SOLID, BorderStyle.POSITION_ALL)

tsb = new TableStyle(TableStyle.STYLE_TABLECELL, "bordered")
tsb.addBorderStyle(bs)

// セル設定
of.setCell(tn, "A1", "ABC")
of.setCell(tn, "A2", "日本語", tsb)
of.setCell(tn, "B1", 123)

of.save()


出力ファイルのイメージ
SimpleODSでセルに罫線を設定したシート

動作環境
groovy 1.7.2, JDK6 Update20, SimpleODS 0.4.4

関連項目

2010年8月18日水曜日

groovyとSimpleODSでOpenOffice Calcのセルの文字色を設定する

groovyとSimpleODSでOpenOffice Calcのセルの文字色を設定するには、以下のコードを実行します。

import org.simpleods.*

// odsファイル作成
OdsFile of = new OdsFile("test7.ods")
// テーブル追加
tableName = ""
"シート1".each {
tableName += "&#" + Character.codePointAt(it, 0) + ";"
}
of.addTable(tableName)
tn = of.getTableNumber(tableName)

// 文字色を設定したスタイル
tsc = new TableStyle(TableStyle.STYLE_TABLECELL, "darkred")
tsc.setFontColor(Util.COLOR_DarkRed)

// セル設定
of.setCell(tn, "A1", "ABC", tsc)
of.setCell(tn, "A2", "日本語")
of.setCell(tn, "B1", 123)

of.save()


出力ファイルのイメージ
セルの文字列色を設定したシート

動作環境
groovy 1.7.2, JDK6 Update20, SimpleODS 0.4.4

関連項目

2010年8月17日火曜日

groovyとSimpleODSでOpenOffice Calcのセル文字を太字に設定する

groovyとSimpleODSでOpenOffice Calcのセル文字を太字に設定するには、以下のコードを実行します。

import org.simpleods.*

// odsファイル作成
OdsFile of = new OdsFile("test6.ods")
// テーブル追加
tableName = ""
"シート1".each {
tableName += "&#" + Character.codePointAt(it, 0) + ";"
}
of.addTable(tableName)
tn = of.getTableNumber(tableName)

// 太字に設定したスタイル
tsb = new TableStyle(TableStyle.STYLE_TABLECELL, "bold")
tsb.setFontWeightBold()

// セル設定
of.setCell(tn, "A1", "ABC")
of.setCell(tn, "A2", "日本語", tsb)
of.setCell(tn, "B1", 123)

of.save()


出力ファイルのイメージ
SimpleODSで太字に設定したセル

動作環境
groovy 1.7.2, JDK6 Update20, SimpleODS 0.4.4

関連項目

2010年8月16日月曜日

groovyとSimpleODSでOpenOffice Calcのセルに右寄せ・中央寄せを設定する

groovyとSimpleODSでOpenOffice Calcのセルに右寄せ・中央寄せを設定するには、以下のコードを実行します。

import org.simpleods.*

// odsファイル作成
OdsFile of = new OdsFile("test5.ods")
// テーブル追加
tableName = ""
"シート1".each {
tableName += "&#" + Character.codePointAt(it, 0) + ";"
}
of.addTable(tableName)
tn = of.getTableNumber(tableName)

// 右寄せに設定したスタイル
tsr = new TableStyle(TableStyle.STYLE_TABLECELL, "ar")
tsr.setTextAlign(TableStyle.ALIGN_RIGHT)

// セルの幅を5cmに設定したスタイル
tsw = new TableStyle(TableStyle.STYLE_TABLECOLUMN, "wide_column")
tsw.setColumnWidth("5cm")
tsw.setDefaultCellStyle(tsr)

// 中央寄せに設定したスタイル
tsc = new TableStyle(TableStyle.STYLE_TABLECELL, "ac")
tsc.setTextAlign(TableStyle.ALIGN_CENTER)

// セルの幅を2cmに設定したスタイル
tsn = new TableStyle(TableStyle.STYLE_TABLECOLUMN, "normal_column")
tsn.setColumnWidth("2cm")
tsn.setDefaultCellStyle(tsc)

// セル設定
of.setColumnStyle(tn, 0, tsw)
of.setColumnStyle(tn, 1, tsn)
of.setCell(tn, "A1", "ABC")
of.setCell(tn, "A2", "日本語")
of.setCell(tn, "B1", 123)

of.save()


出力ファイルのイメージ
SimpleODSで右寄せ・中央寄せを設定したシート

動作環境
groovy 1.7.2, JDK6 Update20, SimpleODS 0.4.4

関連項目

2010年8月15日日曜日

groovyとSimpleODSでOpenOffice Calcのセルの幅を設定する

groovyとSimpleODSでOpenOffice Calcのセルの幅を設定するには、以下のコードを実行します。

import org.simpleods.*

// odsファイル作成
OdsFile of = new OdsFile("test4.ods")
// テーブル追加
tableName = ""
"シート1".each {
tableName += "&#" + Character.codePointAt(it, 0) + ";"
}
of.addTable(tableName)
tn = of.getTableNumber(tableName)

// セルの幅を5cmに設定したスタイル
ts = new TableStyle(TableStyle.STYLE_TABLECOLUMN, "wide_column")
ts.setColumnWidth("5cm")

// セル設定
of.setColumnStyle(tn, 0, ts)
of.setCell(tn, "A1", "ABC")
of.setCell(tn, "A2", "日本語")
of.setCell(tn, "B1", 123)

of.save()


出力したファイルのイメージ
SimpleODSでOpenOffice Calcのセル幅を設定したイメージ

関連項目

2010年8月14日土曜日

groovyとSimpleODSでOpenOffice Calcのセルの文字のフォントサイズを設定する

groovyとSimpleODSでOpenOffice Calcのセルの文字のフォントサイズを設定するには、以下のコードを実行します。

import org.simpleods.*

// odsファイル作成
OdsFile of = new OdsFile("test3.ods")
// テーブル追加
tableName = ""
"シート1".each {
tableName += "&#" + Character.codePointAt(it, 0) + ";"
}
of.addTable(tableName)
tn = of.getTableNumber(tableName)

// フォントを20ptに設定したスタイル
ts = new TableStyle(TableStyle.STYLE_TABLECELL, "big_font")
ts.setFontSize(20)

// セル設定
of.setCell(tn, "A1", "ABC", ts)
of.setCell(tn, "A2", "日本語")
of.setCell(tn, "B1", 123)

of.save()


出力ファイルのイメージ
SimpleODSでOpenOffice Calcのセルのフォントサイズを設定した画面

動作環境
groovy 1.7.2, JDK6 Update20, SimpleODS 0.4.4

関連項目
2010年8月13日金曜日

groovyとSimpleODSでOpenOffice Calcのセルの背景色を設定する

groovyとSimpleODSでOpenOffice Calcのセルの背景色を設定するには、以下のコードを実行します。

import org.simpleods.*

// odsファイル作成
OdsFile of = new OdsFile("test2.ods")
// テーブル追加
tableName = ""
"シート1".each {
tableName += "&#" + Character.codePointAt(it, 0) + ";"
}
of.addTable(tableName)
tn = of.getTableNumber(tableName)

//オレンジ色背景スタイル
ts = new TableStyle(TableStyle.STYLE_TABLECELL, "bg_orange")
ts.setBackgroundColor(Util.COLOR_Orange)

// セル設定
of.setCell(tn, "A1", "ABC", ts)
of.setCell(tn, "A2", "日本語", ts)
of.setCell(tn, "B1", 123, ts)

of.save()


出力ファイルイメージ
SimpleODSでセルの背景色を設定したODSファイル

動作環境
groovy 1.7.2, JDK6 Update20, SimpleODS 0.4.4

関連項目
SimpleODSのホームページ
http://simpleods.sourceforge.net/

2010年8月12日木曜日

groovyとSimpleODSでODSファイルを作成する

groovyとSimpleODSでODSファイルを作成するには、以下のコードを実行します。

import org.simpleods.*

// odsファイル作成
OdsFile of = new OdsFile("test1.ods")
// テーブル追加
tableName = ""
"シート1".each {
tableName += "&#" + Character.codePointAt(it, 0) + ";"
}
of.addTable(tableName)
tn = of.getTableNumber(tableName)
// セル設定
of.setCell(tn, "A1", "ABC")
of.setCell(tn, "A2", "日本語")
of.setCell(tn, "B1", 123)

of.save()


動作環境
groovy 1.7.2, JDK6 Update20, SimpleODS 0.4.4

関連項目

2010年8月6日金曜日

groovyとgdata-java-clientでスプレッドシートのセルの値を変更する

groovyとgdata-java-clientでスプレッドシートのセルの値を変更するには、以下のコードを実行します。

import com.google.api.client.googleapis.*
import com.google.api.client.googleapis.auth.clientlogin.*
import com.google.api.data.spreadsheet.v3.*
import com.google.api.data.spreadsheet.v3.atom.*
import com.google.api.client.xml.atom.*
import com.google.api.client.util.*

// エントリ
public class Entry
{
@Key("@gd:etag")
String etag
@Key
String title
@Key
String id
@Key
List<Link> link
}

// リンク
public class Link
{
@Key("@rel")
String rel
@Key("@type")
String type
@Key("@href")
String href
}

// フィード
public class Feed
{
@Key
String title
@Key
List<Entry> entry
}

public class CellInfo
{
@Key("@row")
String row
@Key("@col")
String col
@Key("@inputValue")
String inputValue
}

// セル用エントリ
public class CellEntry
{
@Key("@gd:etag")
String etag
@Key
String id
@Key("gs:cell")
CellInfo cell
@Key
List<Link> link
}


// Parser設定
GoogleTransport transport = new GoogleTransport()
transport.applicationName = "yourcorp-yourapp-1.0"
transport.setVersionHeader(GoogleSpreadsheets.VERSION)
ap = new AtomParser()
ap.namespaceDictionary = GoogleSpreadsheetsAtom.NAMESPACE_DICTIONARY
transport.addParser(ap)

// 認証
cl = new ClientLogin()
cl.authTokenType = GoogleSpreadsheets.AUTH_TOKEN_TYPE
cl.username = "youraccount@gmail.com"
cl.password = 'yourpassword'
cl.authenticate().setAuthorizationHeader(transport)

// 指定したスプレッドシートの指定した名前のシートのセル値を更新
// keyはブラウザでスプレッドシートを表示した時と同じ
key = "0Aqfa4uztHBXEdDNEc1duOUdDQmd4eURRekdxxxxxxxx"
worksheet = "Sheet1"
requrl = "https://spreadsheets.google.com/feeds/worksheets/${key}/private/full"
request = transport.buildGetRequest()
request.url = requrl
feed = request.execute().parseAs(Feed.class)
println feed.title
println "----"
for( entry in feed.entry ){
if( entry.title == worksheet ){
// セルの値を取得
request = transport.buildGetRequest()
for( lk in entry.link ){
if( lk.rel == "http://schemas.google.com/spreadsheets/2006#cellsfeed" ){
// A1セル=R1C1, B1セル=R1C2
request.url = lk.href + "/R1C2"
}
}
cell = request.execute().parseAs(CellEntry)
// セルの値を設定
request = transport.buildPutRequest()
request.headers.put("If-Match", cell.etag)
for( lk in cell.link ){
if( lk.rel == "edit" ){
request.url = lk.href
}
}
content = new AtomContent()
content.entry = cell
content.entry.cell.inputValue = "更新した値"
content.namespaceDictionary = GoogleSpreadsheetsAtom.NAMESPACE_DICTIONARY
request.content = content;
request.execute().parseAsString()
}
}


動作環境
groovy 1.7.2, JDK6 Update20, gdata-java-2.2.1-alpha

関連情報
gdata-java-client
http://code.google.com/p/gdata-java-client/

2010年8月5日木曜日

groovyとgdata-java-clientでスプレッドシートのセルの値を取得する

groovyとgdata-java-clientでスプレッドシートのセルの値を取得するには、以下のコードを実行します。

import com.google.api.client.googleapis.*
import com.google.api.client.googleapis.auth.clientlogin.*
import com.google.api.data.spreadsheet.v3.*
import com.google.api.data.spreadsheet.v3.atom.*
import com.google.api.client.xml.atom.*
import com.google.api.client.util.*

// エントリ
public class Entry
{
@Key
String title
@Key
String id
@Key
String content
@Key
List<Link> link
}

// リンク
public class Link
{
@Key("@rel")
String rel
@Key("@type")
String type
@Key("@href")
String href
}

// フィード
public class Feed
{
@Key
String title
@Key
List<Entry> entry
}

// Parser設定
GoogleTransport transport = new GoogleTransport()
transport.applicationName = "yourcorp-yourapp-1.0"
transport.setVersionHeader(GoogleSpreadsheets.VERSION)
ap = new AtomParser()
ap.namespaceDictionary = GoogleSpreadsheetsAtom.NAMESPACE_DICTIONARY
transport.addParser(ap)

// 認証
cl = new ClientLogin()
cl.authTokenType = GoogleSpreadsheets.AUTH_TOKEN_TYPE
cl.username = "youraccount@gmail.com"
cl.password = 'yourpassword'
cl.authenticate().setAuthorizationHeader(transport)

// 指定したスプレッドシートの指定した名前のシートのセル値を取得
// keyはブラウザでスプレッドシートを表示した時と同じ
key = "0Aqfa4uztHBXEdDNEc1duOUdDQmd4eURRekdxxxxxxxx"
worksheet = "Sheet1"
requrl = "https://spreadsheets.google.com/feeds/worksheets/${key}/private/full"
request = transport.buildGetRequest()
request.url = requrl
feed = request.execute().parseAs(Feed.class)
println feed.title
println "----"
for( entry in feed.entry ){
if( entry.title == worksheet ){
// セルの値を取得
request = transport.buildGetRequest()
for( lk in entry.link ){
if( lk.rel == "http://schemas.google.com/spreadsheets/2006#cellsfeed" ){
// A1セル=R1C1, B1セル=R1C2
request.url = lk.href + "/R1C2"
}
}
cell = request.execute().parseAs(Entry.class)
println cell.content
}
}


動作環境
groovy 1.7.2, JDK6 Update20, gdata-java-2.2.1-alpha

関連情報
gdata-java-client
http://code.google.com/p/gdata-java-client/